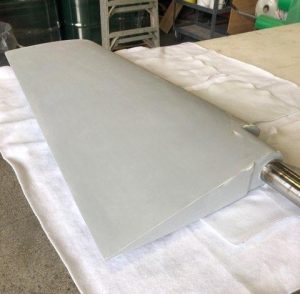
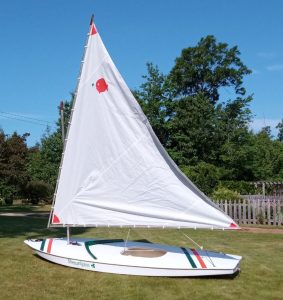
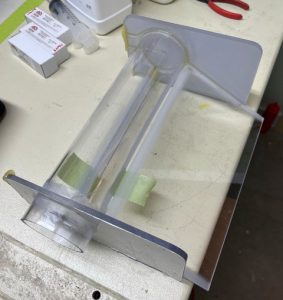
Category Archives: Fixing Broken Stuff!

Repairing My Boat’s Plastic Console

By Craig McCune

After 20-plus years of vibration and pounding on the water, the molded plastic console on my 2001 Lund® boat was riddled with stress cracks and broken pieces. All of the fastener-mounting points were stripped out or broken. As often happens with older boat components, replacement parts were no longer available. I’d have to repair the console myself.

Continue reading

Cemetery Monument Repairs

by Ron Graham

I started working regularly at Pine Ridge Cemetery, an abandoned, historic cemetery in Bay City, Michigan in 2009. For several years, I concentrated on mowing and clearing out scrub growth (clusters of hawthorn with up to 1 ½” thorns). I reached a point where things looked better with the grass and trees. That’s when I began working on monuments that needed to be raised, straightened, or stood up.

Continue reading

The “mug shot” of Big Red’s completed broken grille repair.

Big Red Gets His Smile Back

By Tom Pawlak — GBI Technical Advisor

My neighbor Rollie is always coming up with these unbelievable deals along the highway between his home in Bay City, Michigan, and his cabin a couple hours north. The latest super deal was a big red garden tractor that was mechanically in near perfect working order—except the previous owner ran it into something and busted up the grille. He brought it over and asked if it could be fixed. Heres how we repaired the broken grille on “Big Red.” Continue reading

Michael at Breck before the snowboard was damaged

Snowboard Repair

By Michael Marquis

At the end of the season this year while riding in a local terrain park, I misjudged the approach to a pipe and ended up crashing the nose of my snowboard into the end of the pipe. Fortunately, I was able to ride away from the impact. Later in the day, I noticed that the nose of the snowboard had been deformed. When I got home, I studied the damaged area closely and determined that it was not safe to ride the board in that condition. The entire nose area had become soft and flexible because much of the wood core in that area had been broken. In addition to the bent nose edge, the top sheet had cracked. Left as is, this would have allowed water to penetrate to the core of the snowboard which would have made it unrepairable. The technicians at my local snowboard shop told me it could be repaired but cautioned that I needed to use an epoxy that remains flexible after it cures to prevent the repair from breaking. Continue reading

When the Cat’s Away

Repairing a cracked wall plaque with G/5 Adhesive

By Julie Jezowski

Like a lot of people, when I’m at work I like to keep busy. It makes me feel good about myself and the bonus is that the day just flies on by. Having said that, it’s also nice to escape from the walls of my office now and then and head out into the shop to see what the guys are working on. For some reason, this gravitational pull I feel from the shop occurs more when my boss is away. We can just call it an unexplained phenomenon and leave it at that. During some of my excursions to the shop rather than just observing they let me help them with the projects they’re working on, which I absolutely love! Continue reading

Repairing an Edison Concert Phonograph

By Tom Pawlak — GBI Technical Advisor

Ronnie Janowicz, a good friend of mine, called to say the wooden horn on his antique Edison Concert phonograph was cracked. I had Ronnie bring it by so I could take a look.

I told him it could be repaired very nicely with epoxy if that is what he wanted to do. “Why wouldn’t I want it repaired that way?” he asked. I explained that repairing an antique with epoxy may affect its resale value if the potential purchaser objects to the repair. Some collectors take a dim view of wooden antiques being repaired with epoxy because repairs are not easily reversible like they would be if hide glue was used for repair instead.

Continue reading

Wooden Goblet Rx

By Tom Pawlak — Retired GBI Technical Advisor

Vern, a good friend of mine, turned the exterior of a wooden goblet made from a nice piece of spalted sycamore. Unfortunately, the blank was not as dry as he thought and it cracked along one edge as it sat uncovered on his lathe overnight. He called to see if there was anything available for gluing it back together. I said I had some ideas and asked him to drop it off at work so I could take a stab at the repair. Continue reading

Time is Everything

A last-minute ski repair

By Grant Hilger

On the evening of March 19, 2013, I inspected my 217cm Atomic™ downhill race skis in preparation for race day. Because of the early ending to winter in 2012, these skis have not seen the light of day in almost two years. The only real chance I get to ski with them is at the annual Boyne Highlands Downhill Race in Harbor Springs, Michigan. This late March tradition is usually the grand finale of Michigan’s ski racing season.

This year the weather was shaping up perfectly for outstanding conditions, and I was chomping at the bit to ski fast! Much to my surprise, when I picked up one ski I found that a section near the tail was delaminating. On the inside edge of the left ski, a 1.5″ x 0.5″ area of the top skin was bubbled up from the ski’s sidewall. The bubble was 3/8″ of an inch high. I was less than impressed with this find, knowing that in order to race I’d need to repair the ski.

Delamination area on the ski.

Delamination area on the ski.

Some of the steel inside the ski’s core corroded, causing the top sheet to lose its bond and bubble up. This corrosion was most likely accelerated by salt, which is often used in late-season ski races to keep the snow from softening in the intense sunlight. The salt and water must have made their way into the ski’s core during the 2011 race. It then had almost 24 months for the corrosion to occur. With the issue identified, it was time to plan a repair. The clock was ticking.

I had a cartridge of WEST SYSTEM Six10 Epoxy Adhesive in my repair kit, and I thought that this would work for the application. I rounded up acetone, pipe cleaner, mixing stick, mixing cup, small flathead screwdriver, paper towel, gloves, safety glasses, wax paper, wood blocks, and a C clamp to complete the repair. My plan was to attempt to salvage the top sheet and re-bond it to the ski’s core. This is the procedure I followed:

Step 1: I gouged out the corroded metal from the bubbled-up top sheet. I was careful not to damage the top sheet because then I’d need to repair that as well. I used a shop vac to help suck the metal shavings out of the hole in the ski. Once all the corroded metal was removed, I blew out the void in the ski with compressed air.

Step 2: I used a pipe cleaner and acetone to clean out both the inside of the ski’s top sheet and the ski’s core to aid bonding.

Step 3: Once the area was dry, I mixed a small amount of Six10 adhesive and brushed it into the void on all surfaces with another pipe cleaner. I then used the plastic mix stick to fill in the void as much as possible. This probably added more epoxy than was needed, but it was such a small area that I wasn’t too concerned with waste when it squeezed out. I was more concerned that the repair was robust.

Step 4: I applied wax paper to the skis so that the epoxy wouldn’t get anywhere that I didn’t want it to, and then I clamped the ski as shown in the photo.

The ski repair, clamped and curing at 68°F

The ski repair, clamped and curing at 68°F

Step 5: I allowed the epoxy to cure for 24 hours before removing the clamp.

The repair seemed to be sound, and time was of the essence, so I prepped the skis for racing by hot waxing them with the race wax. I was concerned that adding heat to the ski this quickly after curing might compromise the repair. To my delight, everything held fine. Hurdle number one, cleared.
Now the ski had to hold up to the stresses, vibration, and temperature of a 38 second, 60+ mph run down an icy ski hill. The ending to this story is a happy one. The repair passed its first trial with flying colors. No ill effects were observed in the ski’s performance, and following the race run I inspected the repair. It looked like just as it had when I removed the clamp earlier that week. If you’re at all interested in the race, the skis allowed me to complete the race run in 37.99 seconds, hit a top speed of 66.1 MPH as recorded on GPS, and win my age class by 0.5 seconds (a significant margin in ski racing).

A timeline of the events:

• 3/19/13 (6 pm) – Discovered ski delamination
• 3/19/13 (8 pm) – Ski repair complete, epoxy clamped and curing
• 3/20/13 (7pm) – Hot wax skis for race day
• 3/24/13 (1pm) – Race

Ski repair complete, ready for wax, and then the race.

Ski repair complete, ready for wax, and then the race.

For this repair, time really was everything!


Quick Fix for a Damaged Table Saw Rip Fence

By Tom Pawlak — GBI Technical Advisor

25 years of use (some might say abuse) had taken its toll on the heavy aluminum rip fence on our Delta Rockwell 12″–14″ Tilting Arbor Saw. Deep saw kerf grooves on the face of the fence had become a hazard because wood occasionally got hung up on it when ripping stock. Over a few months, each time I used the saw I thought about how it could be repaired. While the plan was still developing in my head, more than once I clamped a flat piece of plywood to the rip fence face to temporarily create the smooth surface that I needed.

Continue reading
snow shovel blades

A G/flex Modified Snow Shovel

By Tom Pawlak — GBI Technical Advisor

I decided to modify my new plastic snow shovel with G/flex 655 Thickened Epoxy Adhesive. This winter (2011) in Bay City, Michigan, we’ve seen a couple of big snowfalls and lots of small ones with 1″ to 2″ of accumulation. Not enough snow to bother breaking out the snowblower, so I usually shovel it by hand. About 10 years ago I fell in love with the plastic snow shovels that are lightweight and the snow slides off of them easily compared to the metal snow shovels that are heavy and snow clings to stubbornly. Continue reading