Category Archives: Techniques & Tips

Mike's fancy epoxy caddie

The Coupe de Ville of Epoxy Caddies

By Mike Barnard

Inspired by an old Boatbuilder article by Captain James R. Watson, my father and I built our own deluxe epoxy caddy, which we call the Coupe de Ville of Epoxy Caddies. My dad has grown very fond of WEST SYSTEM® Epoxy and his box of epoxy-related items has been growing at a steady rate. The overflow of his box in an already “treasure” packed garage emphasized his need for an organization and storage system for these materials. We have had several requests for this same type of solution lately. Continue reading

Bubble-Free Epoxy Coating

By Mike BarnardDon Gutzmer

WEST SYSTEM® Epoxy has long been a popular choice for clear coating tabletops, and for these applications, you’ll want a bubble-free epoxy coating. Epoxy works great as a buildup coat and a moisture barrier. It also showcases the beauty of wood grain and fiber weaves. Formulated with boat building in mind, WEST SYSTEM Epoxy is not intended as a final finish coating. You may find it a bit more difficult to achieve a perfect surface with epoxy than with a coating formulated specifically for final finishing, such as varnish. Here’s how to make sure your epoxy coating is bubble-free.

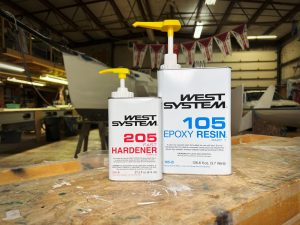
However, WEST SYSTEM offers some distinct advantages. It builds up quickly: a single coat of 105 Epoxy Resin® with 207 Special Clear Hardener® offers about four times the thickness of a typical coat of polyurethane varnish. WEST SYSTEM epoxy is also an excellent moisture barrier, stabilizing the surface so your final finish coat will look beautiful longer.

When coating a surface that will be used outdoors, it’s important to put a UV-resistant clear coating over the epoxy. While 207 Special Clear Hardener contains a good UV inhibitor, it will still need additional UV-resistant coats to withstand the degrading effects of sunlight on epoxy.

Since you will need to sand down the epoxied surface and coat the epoxy with varnish, getting a perfect coating isn’t strictly necessary. But the better shape it’s in, the more easily you will achieve a beautiful, bubble-free finish. The key is creating the smoothest, flattest epoxy surface possible. This will save you a lot of sanding later.

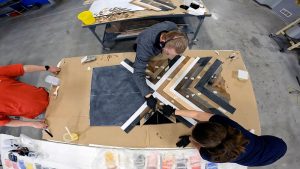
Last summer here at the Gougeon shop, we laminated a 35-year-old conference table with carbon fiber and WEST SYSTEM 105/207. We experimented with different methods of achieving a smooth, even, bubble-free epoxy coat to reduce the need for sanding prior to the final finish coating. (Editor’s note: 10 years after this article was written, that carbon-fiber conference table still looks terrific.)

Prepare the surface

Proper surface preparation is one of the most important steps in using epoxy. Make sure the surface is clean of contaminants such as wax and paint. Sand the surface smooth. Avoid using solvents immediately before applying the epoxy.

Eliminate dust

Getting a perfectly smooth surface starts with clearing the air of small particles. These particles may seem harmless, but once they are on a glossy surface it will not look nearly as good as it could. Avoid using tack rags. Vacuum the surface before coating.

Understand outgassing

Before coating bare wood, heat the wood and apply the epoxy while the wood is cooling. During cooling, the air in the wood contracts, drawing the epoxy in for a bubble-free epoxy coating. The opposite happens if you coat wood as it’s warming (such as in the morning, in the sunlight, near a heater or anytime ambient temperature is rising). The air in the wood will expand and “outgas” while the wood’s temperature is rising, resulting in bubbles in the curing epoxy coating.

Applying over stains

Be careful when using WEST SYSTEM Epoxy over commercial stains. Some stains prevent epoxy from penetrating into the wood. The result can be epoxy that fisheyes or peels off after final cure. Always perform a test before using epoxy over a stain.

Avoiding blush

It’s easy to avoid the inert, waxy residue that is sometimes a byproduct of the curing process and is commonly called “blush.” Simply use WEST SYSTEM 207 Special Clear Hardener. It cures blush-free. It’s also formulated for excellent wet out and self-leveling. It cures extremely clear and without color.

If you are using WEST SYSTEM 205 Fast, 206 Slow, or 209 Extra Slow Hardener, blush might develop on the surface, depending on working conditions. It’s easily removed after the epoxy cures with plain water and a light scrubbing with a Scotch-Brite™ pad. These hardeners are not normally recommended for clear coating.

Rolling and tipping

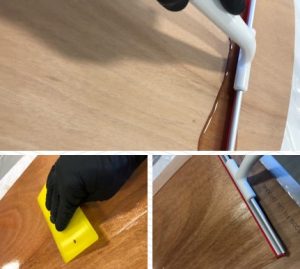
The only recommended way to coat vertical surfaces with epoxy is the roll and tip method. Roll the epoxy on with a foam roller, then “tip” by dragging another roller across the surface to smooth the epoxy layer.

Tip off wet epoxy with a roller cover brush using long, even overlapping strokes. This will leave a bubble-free epoxy coating.

Tip off wet epoxy with a roller cover brush using long, even overlapping strokes. This will leave a bubble-free epoxy coating.

Flow coating

This is the best method for encapsulating items in a bubble-free epoxy coating. The fewest bubbles result if epoxy is poured from the bottom of a container. A word of caution: Never pour a single layer of epoxy thicker than ¼”. Thicker amounts can quickly overheat or “exotherm” during cure, resulting in quite a mess on your lovely surface. If you want a final thickness greater than ¼”, wait until the first layer is cured to the point where it’s firm and about as “tacky” as masking tape then apply the next coat on top of that.

If encapsulating items such as coins, medals, bottle caps and photos on a flat surface, affix them in place with decoupage glue such as Mod Podge® (readily available at craft stores). It’s compatible with epoxy and will prevent your items from floating around. Use it to pre-seal photos and other paper items.

Propane torch

This method of achieving a bubble-free epoxy finish has been used for years by technical advisors at Gougeon Brothers. Not only is it effective for removing air bubbles from the surface, it also lowers the viscosity of the surface and flattens it out a bit. Be very careful when using this technique because leaving the flame over one spot for too long could cause bubbles to appear. We don’t recommend using a propane torch over epoxy-coated bare wood. Doing so may cause outgassing into the epoxy layer.

A thick coating of epoxy with bubbles in the coating.

A thick coating of epoxy with bubbles in the coating.

Pass a torch flame quickly over wet epoxy to warm the surface, reduce the surface tension, reduce viscosity slightly and release air bubbles, resulting in a bubble-free epoxy finish.

Pass a torch flame quickly over wet epoxy to warm the surface, reduce the surface tension, reduce viscosity slightly and release air bubbles, resulting in a bubble-free epoxy finish.

After a quick pass with a torch, the bubbles are released and the coating begins to flow out.

After a quick pass with a torch, the bubbles are released and the coating begins to flow out.

Denatured Alcohol

Spraying a fine mist of denatured alcohol over the surface will pop air bubbles as well as lower the viscosity of the surface and flatten it out. There is little risk in this method because denatured alcohol evaporates fairly quickly and does not cause air bubbles to propagate. A fine mist is critical. To get the fine mist we purchased a bottle of hair spray with a push button pump (a Windex™ sprayer is not fine enough) and replaced the hair spray with denatured alcohol.

A fine mist of denatured alcohol will reduce surface tension and release air bubbles, resulting in a bubble-free epoxy coating.

A fine mist of denatured alcohol will reduce surface tension and release air bubbles, resulting in a bubble-free epoxy coating.

Bond Lines in Adhesive Bonded Structures

Understanding Bond Line Stresses in Composites

By Jeff Wright — Vice President of Technical Services

This article will discuss some of the engineering aspects to consider when designing or repairing an adhesive bonded composite structure, particularly bond line stresses. Fiberglass reinforced plastic and other composites influence the design of many products manufactured today. Boat hulls, sports equipment and airplanes can easily take new, complex shapes when composites are used in place of traditional materials. Reinforcing structures also benefit from the versatility of composite materials when prefabricated components are bonded with a high-strength adhesive. Continue reading

White Oak Redux

White Oak Redux

by Bruce Niederer and Bill Bertelsen

Building stuff, especially boats, with wood is much like a religious calling; once you hear the call, there’s no turning back. Those who’ve heard the call will not suffer fools willingly, so when I decided to conduct some white oak adhesion and shear testing and report the results in Epoxyworks 31, skeptics and believers alike took to the internet wooden boat forums-and had no problem speaking their minds! Having healed from the pummeling I took in some quarters, I’m back again to report the promised follow-up test results. Continue reading

WEST SYSTEM Boat Repair Kits

New Boat Repair Kits

New for 2012, WEST SYSTEM is offering three specialized boat repair kits designed with the do-it-yourselfer in mind. Each contains the right materials and instructions for making lasting repairs and is available at your local stocking WEST SYSTEM dealer. Continue reading

Sanding tricks from Damian McLaughlin

Sanding Tricks of the Trade

By Damian McLaughlin

All of the boat builders that I know have little sanding tricks that make a job go faster or do it better. Fairing a 40′ custom-built hull is an arduous task that is often accomplished with two-man teams and fairing boards. We do 90% of the work with a grinding device. Almost everyone in the business will agree that a grinder will remove a substantial amount of material quickly. The trick is controlling that removal. Continue reading

Shop Floor Testing Methods

Shop Floor Tests

By Jeff Wright — Vice President of Technical Services

Boatbuilders or advanced hobbyists often want to learn more about the characteristics of the fiberglass laminate they’ve just created. But sending samples to a professional testing laboratory can be expensive and impractical. Fortunately, you can do these simple shop floor test that will yield reasonably accurate results. Continue reading

At the end of the three-day Family Build Weekend, the nine family teams pose with their assembled Sassafras 16 canoes. After some additional sanding, coating and finishing these handsome lapstrake canoes will be ready for the water.

Sassafras 16 Family Build Weekend

by Grace Ombry
Cover Photo: Semi-finished Family Build Weekend Sassafras 16 canoes on display at the 2010 WoodenBoat Show at Mystic Seaport.

Cover Photo: Semi-finished Family Build Weekend Sassafras 16 canoes on display at the 2010 WoodenBoat Show at Mystic Seaport.

WEST SYSTEM®, Chesapeake Light Craft (CLC) and nine family groups joined forces at the 2010 WoodenBoat Show at Mystic Seaport in Connecticut this June for the Family Build Weekend to build nine Sassafras 16 kit canoes. With only a blue and white striped rental tent to shield them from the unseasonably hot weather in Mystic that weekend, everyone labored hard to get their boats a long way toward completion in just three short days. Continue reading

So Stands the Mighty Oak

Testing Epoxy’s Adhesion to White Oak

By Bruce Niederer — GBI Technical Advisor

People have been building boats using white oak for centuries, sacrificing blood, sweat, and tears to engineer wonderful and enduring vessels of all shapes and sizes.

Oak was often used because of its desirable properties and behavior. It is dense, strong, rot-resistant, holds fasteners well, and can be steam bent. In the days before glues and adhesives, oak planking was used because it would swell considerably which resulted in tight and sound hulls, meaning little leaking and dry interiors. Of course, time marches inexorably forward, and eventually, builders began using adhesives to augment or, in some cases, replace mechanical fasteners.

We’ve been debating the issue of gluing oak ever since. Continue reading

A mold was taken from an undamaged column base covered with stretch wrap.

Repairing Damaged Wood Trim

A Professional Technique

By Tom Pawlak — GBI Technical Advisor

When repairing or replacing missing sections of damaged wood trim such as in wood moldings, it helps to have a way to do it efficiently. If you’re repairing historically significant architecture, your method should disturb as little of the original wood as possible.

Continue reading