Chair Repair
Spring 2002

GET STARTED
FREE PRINT & DIGITAL EDITIONS
Spring 2002
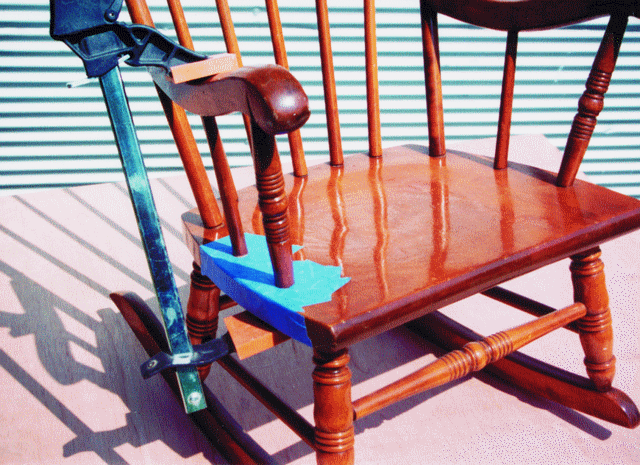
Above: The chair repair. Masking tape protects the seat, and the arm is clamped in position while the epoxy cures.
My cousin, Gary, brought me the broken chair shown in the picture below. The spindle and arm assembly was broken off where it attached to the seat of chair. Although the chair was not a priceless antique, it had sentimental value and he wondered if I could do a chair repair. While I was not concerned about the structural aspects of the repair, the cosmetics could be difficult. Fortunately, the spindles were not badly splintered so it was reasonably easy to make the repaired area look good.
The key to success in a chair repair is reinforcing the joint. There is not enough surface area in the broken spindles to provide a lasting repair if you just glue them back together. The first jolt to the arm of the chair would have surely broken the glued joint again. So I knew the broken joints would have to be reinforced. I used 3″ drywall screws with the head sawed off to make metal dowel rods. One half of the screw went into the broken tenon and the other half up into the spindle. The screws provided a lot more surface area for the glue joint as well as providing reinforcing across the broken wood fiber.
My cousin asked how I would line up the holes I needed to drill for the drywall screws precisely enough for good alignment. Easy precision is not necessary. I drilled oversize ¼” diameter holes, just over 1½” deep, in both ends of each broken spindle (below). There is plenty of slop in a ¼” hole to hold a drywall screw and still get the alignment of the spindles right. I was careful not to drill out the side of the spindle; other than that, alignment was not critical. To fill up the empty space between the drywall screw and the oversize hole, I would fill the hole with thickened WEST SYSTEM Epoxy, pressing the screw into the wet mixture and assembling the arm back onto the chair.

I first masked (blue 3M™ masking tape) the spindles and the chair base to keep the excess glue from getting on the surrounding varnished surfaces. Next, I did a dry run to be certain that all parts went together and that I could successfully get a clamp on the assembly. Then, I applied glue to all mating surfaces and injected thickened epoxy into the holes. I also coated the threads of the drywall screws. I thickened the epoxy with 405 Filleting Blend because the wood tone color of this filler nicely matched the stained wood of the chair. I pushed the assembly together and gently clamped the arm to the chair base (below). I cleaned up the epoxy squeeze-out, removed the masking tape, and allowed the epoxy to cure overnight.
Using WEST SYSTEM Epoxy can be an excellent way to repair damaged furniture. In this case, the chair was not worth the expense of making new spindles and trying to match the stain and finish of the rest of the chair. With epoxy, the chair repair took about 30 minutes and the chair was ready for use the next day. I expect the repair to last the lifetime of the chair.


