
By Captain James R. Watson
What has eyes yet cannot see? A potato. But not this one. This special spud is 15 feet long and hangs in an indoor/outdoor market. It also houses a security camera which peers out of smoked Lexan® eyes. So this potato does see, guarding the real potatoes and bananas from would-be vegetable larcenists.
Suppose you needed a 15 foot-long potato. Well, not a real potato, but a sculpture that looks just like a potato. Unlike your run-of-the-mill spud, this one would have to hang outside exposed to wind and weather. It would need to be sturdy and light weight. You’d also need it to last a long time — no rotting allowed. What would you make it out of?
Foam is the answer. It’s easy to shape, pretty cheap, light weight and doesn’t rot. Epoxy can be used to solve some of foam’s inherent problems, like fragility and porosity, making it a viable solution for a variety of unusual projects.
People have asked us if they can coat Styrofoam® with epoxy, concerned that the epoxy would attack it. It’s a good question, because some resin formulations contain solvents that will chemically attack foam and melt it. But WEST SYSTEM® epoxy is not formulated this way and will not melt foam. Many of our customers have succeeded using different foams with epoxy in a number of ways, like building a gigantic, seeing-eye potato, for example.
Most foam is available in 4-inch thick planks. To sculpt a large foam form, the first step is to laminate planks together, building a block larger than the finished form. Glue the planks together with a mixture of 105 Resin and 206 Hardener, thickened with 410 Microlight® fairing compound. Use a notched trowel to apply a layer to the foam plank surface. Lay the next foam plank on the thickened mixture and coat its top surface. Repeat until your foam block is the general size and shape you need.
CAUTION! Although there are no ingredients in epoxy that melt foam, applying an epoxy layer that is too thick, or filling a void that is too large, can cause it to exotherm and the resulting heat can melt the foam.
Sculpting and shaping foam
The great thing about the low density foams is that they are easy to carve. Start by using a hand saw, Surform® rasps, Dremel® tools or coarse sandpaper to get your foam block down to the basic shape you are after. To sculpt a 15′ tuber for example, just start by cutting away everything that doesn’t look like a potato.
When you’re ready to do the detail work, you can make a custom shaping tool and tailor the grit for the intended result. Simply make a sanding block of foam, cutting to shape if necessary. Coat it liberally with epoxy and while it’s still wet, sprinkle on the desired grit of sand (or sharp stones) and allow it to cure. You can really carve away at the foam sculpture with your oversized, lightweight foam tool – sort of a giant potato peeler for foam produce.
One problem with low-density foams like Styrofoam® is that they are susceptible to crushing, breakage or marring. A coating of epoxy can protect the foam. When more serious reinforcement is called for, you can cover the foam with fiberglass fabric and epoxy.
Another inherent problem with foam is that it is often porous and difficult to paint with any detail. A coating of epoxy thickened with 410 Microlight will fill in the pores and leave a smooth, paintable surface. When mixed to a non-sag consistency, the Microlight/epoxy mixture sands and shapes like a typical foam, too. Coating foam with epoxy and paint will protect it from wind, rain, snow and sunlight that might otherwise degrade the surface.
You can cut the nearly completed form in two and hollow out the center to save weight (or mount cameras). Use thickened epoxy to bond the two halves together again before finishing. Use thickened epoxy to bond long eye bolts or threaded rods into foam for hanging or mounting.
Nose protection
Epoxy also protects a foam display piece at the Chicago museum of Science. The museum features a full-sized version of a space shuttle, and the shuttle’s foam nose lies right next to an aisle that visitors walk on. The conical nose was shaped with foam and painted black. But passersby would inadvertently bump or kick the nose and the soft foam would dent. The solution lay in a simple layer of fiberglass fabric bonded with epoxy to toughen it for the heavy traffic.
Keeping cool
One of the great things about foam is its insulation properties. Picnic coolers are essentially a plastic shell with a foam core that stiffens the structure and provides insulation to keep the contents cold.
We’ve built coolers for boats, custom designing them to fit into tight corners and optimize space. A well-made custom cooler will hold ice for nearly a week.
Start with 1/4″-thick plywood and build a box to the desired outside dimensions. Line the bottom with 2″-thick blue construction foam which has an R-value of 19 or higher. Line the sides with 1″ foam. Use epoxy thickened with 410 Microlight to bond the foam inside the box. Eliminate all voids to prevent heat gain. Microlight makes a strong enough epoxy mixture and has a pretty good insulation value of its own.
Fit an interior box made of 1/4″ plywood over the foam. Use epoxy thickened with 410 Microlight to bond the plywood box in and fillet the inside corners of the box. Bond a layer of 4 oz. on the inside of the box. Filleted corners will make it easier to apply fiberglass inside the box, and also make the box easier to clean later.
To finish the interior, apply multiple coats of WEST SYSTEM 105 Resin with 205 Hardener. Add 501 white pigment to the mixture to produce a smooth, white surface.
Now add a lid. A good arrangement is two panels piano-hinged in the center. They can be removed for lowering ice or large frozen food items into the cooler. Your cooler lid can double as a food preparation surface if you use plastic laminate on top. Add sea rails at the edges to keep things from sliding off.
For the cooler’s drain holes, we use thru-hull fittings with petcocks in the lines. We cut an oversized hole in the foam for the thru-hull fittings, then fill it in with canned spray foam (available at home-improvement centers).
With epoxy, foam can become a versatile, durable material for set building, sign making, museum replicas, custom coolers and even gigantic, seeing-eye potatoes.
How to lose 655 pounds
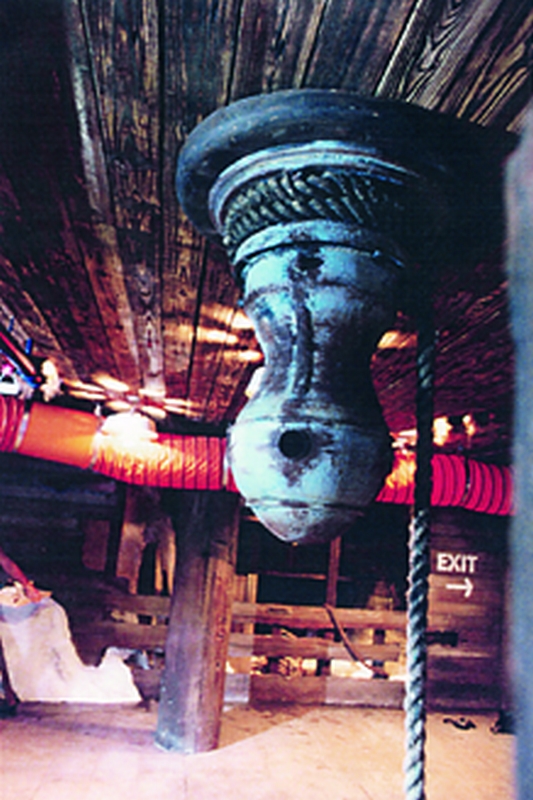
At the Wild Arctic at Florida’s Sea World, designers and builders used foam to solve a logistical problem. They were building a scene designed to simulate the ocean floor. Visitors enter through a re-creation of an overturned ship’s hull. Everything is upside down: the cabin floor is above you and you walk on the underside of the make-believe ship’s deck.
To add authenticity, an old, original ship’s capstan was acquired and brought in to be mounted overhead. But the carpenters said, “Wait! This cast iron capstan weighs 700 pounds – the cabin floor (actually, the ceiling) was never intended to carry such a weight.”
Enter Frank Smeker and his company, Creative Display Installation of Freeland, Michigan. They have built all sorts of sets, displays, sculptures and wonders with a variety of materials, often foam reinforced with epoxy. They made a foam reproduction of the 700 lb. capstan.
First they laminated the foam to form a blank, with plywood discs at the thickest sections for weight bearing when transporting and for template guides. A shaft passed through the center. Simple supports served as bearings so the foam laminate could be turned. A rope was wrapped around the shaft and a helper walked pulling the rope thus turning the part. They did the initial shaping with a chain saw, then used rasps and sandpaper for the finer details. To toughen the surface, they coated it with WEST SYSTEM epoxy and 4 oz. fiberglass fabric. They added a final layer of lighter fiberglass and epoxy, then painted the capstan for an authentic look.
The carpenters had no trouble lifting and attaching the new capstan because it weighed a mere 45 lb.