

By the Gougeon Technical Staff
Strip planking, strip plank laminating, and strip composite may be different methods of construction but they have in common the process of installing strips over frames that define the structure’s shape. These are general guidelines describing the process.
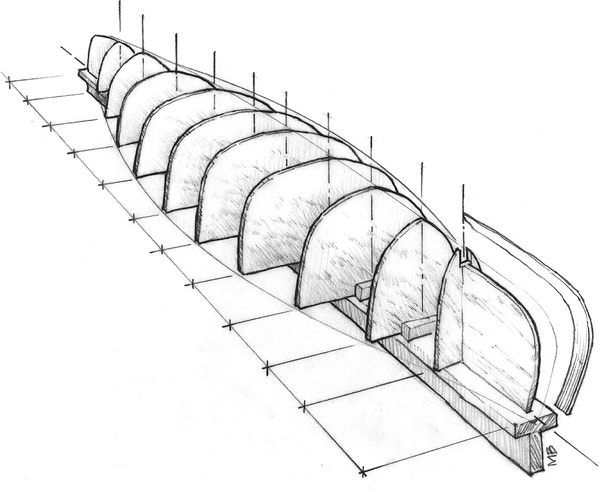
First, the mold
A typical boat hull mold calls for lofted profiles of the hull at regular intervals, or stations, along the length of the hull. These profiles may be temporary frames (to be removed after the stripped shape is reinforced), or they may be a mixture of temporary frames, permanent frames, bulkheads or other components.
In larger boats, the keel, stem, shear clamp and transom are often incorporated within temporary molds to become part of the permanent hull. In small boats, these things are most often added after the planking is finished.
Although most boat hulls lend themselves to male molds, in some instances, there is an advantage to stripping a shape inside a female mold. For example, the main hull of the Formula 40 trimaran Adrenalin is rounded top and bottom. This made it more convenient to build in left and right halves in female molds. Much of the interior components were installed before the halves were glued together—much like building a plastic model airplane fuselage. The telescope in the article on page 15 is also cylindrical and was built in halves and glued together.
Plywood or particle board are most often used for temporary mold frames. For the difference in cost, 3/4″ material makes a stiffer, more accurate mold than 1/2″, and gives you more meat to fasten the strips to.
On small boats the mold frames are rigidly attached to a stiff beam called a strongback that can be placed at a convenient working height. On large boats molds are rigidly attached to the floor.
Planking thickness and the shape of the hull determine the standard spacing between mold stations. For 1/4″ thick planking (canoes), 12″–16″ frame spacing is typical. For 1/2″ thick planking, frame spacing is about 24″, and for 1″ thick planking, spacing may be 30″ or more. If there are areas of tight, sharp curves which cannot be properly defined by the general station spacing, insert additional mold frames between the standard molds in these areas.
One of the critical parts of any strip construction project is accurately lofting and setting up the mold frames. Accurately mark the centerline of each frame and accurately align and plumb the centerlines of all the frames. Use a stiff batten to check for fairness of the mold frames and any permanent members. Be sure that the bevels on all molds are fair. Hard spots may dent the planking as it is bent over the edge of a mold, which may show in the finished interior.
To avoid bonding the planking to the temporary mold frames, cover the edges carefully with tape or strips of heavy plastic sheeting. Do not cover any permanent members you want to attach the planking to permanently. Protect everything else under and around the mold from epoxy drips, with tape or plastic sheeting.
When you have completed this, you are ready to install the first strip.
Plank layout
For some projects planking can be as simple as laying the first strip beginning on one side of the mold then laying strips edge to edge until you reach the other side of the mold.
Generally the girth of a boat is greater amidships than at the bow and stern. To accommodate this difference, strips are allowed to run out at the keel and the shear as they approach the ends of the hull. Unless the hull is particularly fat for its length, this technique presents no difficulties, provided that the planking is thin enough to bend easily edgewise as it arcs toward the sheer or keel.
With a very full or rounded hull, there are two ways to reduce the severe edgewise bending of the strips. Which method you choose depends on how fat the hull is and on the aesthetics of the strip layout in a clear finished hull.
Master plank method
The goal is to locate the master plank about midpoint along the midship girth. This usually positions this first strip along the turn of the bilge. The strips on either side of this master strip will have the same degree of edgewise bending as you plank toward the keel or the shear.
To determine the location of the master plank, measure the profile of a number of frames along the hull and mark the mid-point between the keel and the sheer on these frames. Position a batten along these points and adjust it to achieve a fair curve, ignoring the last few frames at the bow and stern. By measuring up or down from the batten at various points on all the frames, you can get a better idea about how the planking will lie on the rest of the hull. On clear finished hulls the master plank and subsequent planking to the shear should compliment the lines of the hull and be pleasing to the eye. On painted or laminated hulls, planks will show only on the interior, so reducing plank bending may be the first consideration.
When you have lined up the batten and adjusted it to suit the looks of the hull and the bending of planks, carefully mark its position on each station. Then install the master plank using these marks as reference.
If you decide that the shape of your hull is not well suited to this type of planking procedure (for example, if the hull is too fat), you can use the double run planking system.
Double run planking
With this method, the hull surface is divided into two or more planking areas. The planks that run parallel to the keel are usually installed first. Planks are laid out from the keel to the bilge area where they are trimmed off in a fair curve. The shape of this curve should be designed to accommodate the second run of planking up to the shear without excessive bending and, for clear finished hulls, to look pleasing.
Use a batten to decide where this break line between planking areas will be located. On clear finished hulls it will ideally be located below waterline where bottom paint or a boot stripe may hide it. On hulls where the turn of the bilge is fairly sharp, shift the break line to a flatter area closer to the keel. Strike a fair curve, keeping in mind the plank layout up to the shear.
Lay the bottom strips far enough beyond the trim line so the surface will be fair at the trim line. Use the batten again to mark the curve on the strips. Trim the area with a small circular saw set to cut the exact depth of the strips. Then begin planking the second run from this edge up to the shear.
This double run planking method takes more time to produce a hull than would a well planned single run plank scheme. However, on very fat hulls, the double run method should eliminate extreme plank bending and the need for spiling or cheater planks. Some hulls such as kayaks or catamarans may require three or more planking areas to control excessive plank bending.
Spiling and cheating
Occasionally it may be necessary to taper or spile some of the strip planks to fit the narrower end of a hull. If you are using strips with an edge profile, e.g. bead and cove, the profile will be removed. Without the nesting profile, use small dowels or toothpicks in pre-drilled holes to align strips in these areas.
In some cases the opposite is true and additional planking width is required near the bow and stern. Cheater planks can be added between planks at the bow and stern. These are gradually tapered planks that look like long wood wedges. An occasional spiled plank or cheater plank allows the next few planks to be positioned with less effort and torment.
These are some of the general principles of the process of strip planking. The actual techniques vary depending on the size and shape of the boat and of coarse, on whether it will be clear finished.


