WOW 17 Years Later
Spring 2017

GET STARTED
FREE PRINT & DIGITAL EDITIONS
Spring 2017
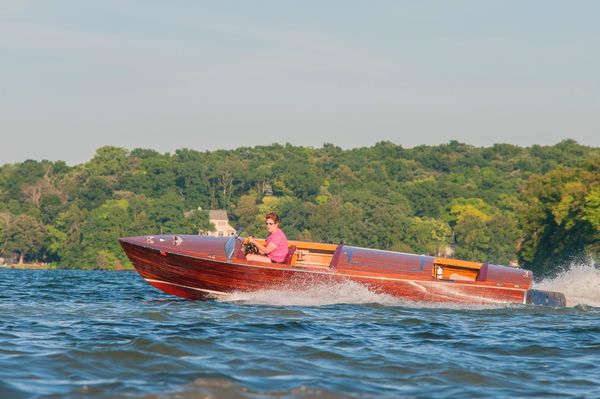
WOW, the home-built runabout I completed in 2000, has been a focal point of summer activities for our family and friends over the years. We’ve spent hundreds of happy hours out on the water, and taken it on vacations to northern Wisconsin, Kentucky, and New York. The majority of WOW’s use has been in Lake Nagawicka in Southeast Wisconsin.
WOW is a 20′ Glen-L Riviera with an inboard 350 cubic inch V8 engine. The hull is constructed of white ash frames, okoume plywood inner laminations, and a Honduras mahogany outer layer. The exterior is sheathed with 4 oz. fiberglass cloth on the deck, and 6 oz. on the sides and bottom. Primary construction was over one winter (see WOW by Mike Barnard in Epoxyworks 43). We started the build at the end of August 1999 and launched at the end of June 2000. The project continued with ongoing additions for the first several years, including upholstering the seats, installing a snap-on cover, a swim platform, cup holders, a wakeboard pylon, and a sound system.
I chose WEST SYSTEM Epoxy due to the ready availability of information on its use, the testing data available at westsystem.com, and the single best reference book I could find on boatbuilding: The Gougeon Brothers on Boat Construction. I have continued using WEST SYSTEM Epoxy products for WOW’s upkeep, as well as for a variety of unrelated furniture building projects and repairs. It lends well to the Craftsman style furniture I build, and my “finish first, assemble second” strategy. This works particularly well when you have dozens of pieces to assemble, such as a Craftsman-style bed.
The boat requires maintenance due to use and “abuse.” We’re fortunate in that we can leave the boat in the water from early May through late October, at a friend’s house. But since this location isn’t a good place for a boat lift, WOW is in the water the entire summer. There are tremendous advantages in not having to trailer the boat for each use—we have easier access to water, and we get to skip the boat launch lines, or worse, the “Boat Launch Full” sign that typically goes up in our area by 10:30 AM most summer weekends.
We’ve learned a lot caring for WOW over the years, and there are a few things we would have done differently regarding WOW’s construction, maintenance, and improvements if we’d known better at the time. My hope is to fill in the gaps for others.
When we built the freshly sawn and sanded hull, it looked too light colored compared to the classic look we wanted. After reading and consulting with the Technical Advisors at Gougeon Brothers, Inc., we decided to use an oil-based stain, dry it well and scuff sand prior to applying fiberglass. The deck, on the other hand, was not stained. The finishing board outer band is black walnut. Our goal was a three-toned design (dark mahogany hull, darker walnut edges, and a light mahogany deck with white stripes). Over time, it has developed a two-tone layout.
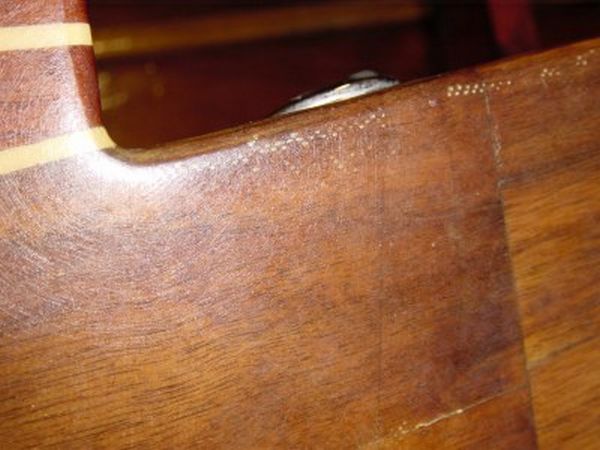
By the end of the first or second summer, the walnut had faded, to a lighter color than the mahogany. The mahogany on the deck grew nearly as dark as the stained hull sides. The staining was unnecessary, and it appears that it made the bond between the wood and fiberglass weaker. This shows up when the anchor gets banged against the hull—the fiberglass debonds when the wood is dented. We repair the dented, debonded areas by slitting the glass and injecting fresh epoxy for a close—but not completely invisible—repair.
We store skis, kneeboards, wakeboards, paddles, anchors and so on under the deck. In the course of use, these things bang into the boat’s frame members, stringers, and battens. The damage is concentrated at the edges of the frame boards. The best treatment is to fully round over the edges. The larger radius of the edges will help deflect and absorb blows, reducing both wood compression damage and finish fractures. Consider a ¼”radius the minimum. It’s better if you can achieve 5/16″.
After several spring repair sessions, I went through the frame members with a trim router, scrapers, chisels, rasps, etc. to create the larger radius edges. This was no fun, as I had to do much of it lying down inside of the boat. It would have been far easier to do during the initial build.
I treated these newly radiused edges with the normal triple coat of epoxy. They have held up quite nicely.
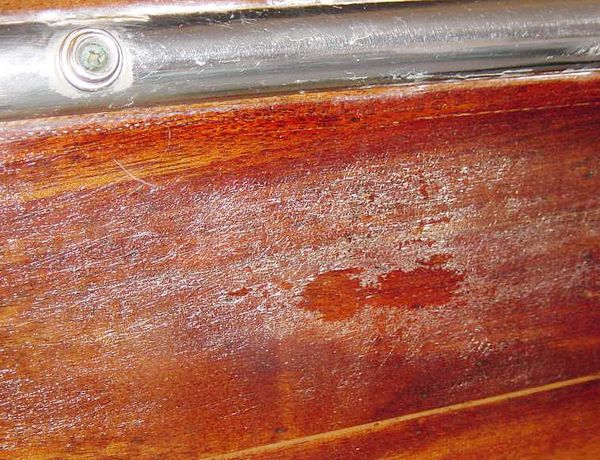
The majority of the framing is white ash. However, there was nothing available in the sizes needed for the stringers without a glue up and fixturing. This would have delayed the start of the build by a few weeks, and added more unknowns (for example, how straight could I make them on my basement floor?). So instead we built the stringers with redwood 2’x6’s, which at the time could still be purchased in 20′ lengths. These were quite straight. This worked well, but the redwood dents rather easily and became a focal point of damage from the anchors (repeat offenders that they are), skis, wakeboards, etc. Each time the stringer edges were hit hard and dented, the epoxy would either crack or de-bond. Then water would get in, and the redwood would blacken and look ugly.
I solved the problem by sanding well, rounding over the edges, and applying fiberglass to the top and sides with 6 oz. glass and a double layer on top. It would have been much easier to do this at the initial assembly, but it has held up admirably.
We have floorboards only between the stringers. They were initially nicely fitted with small gaps. However, this made removing them difficult (for pumping the bilge, cleaning, storing ski lines and handles, etc.). As a result, the edges got dinged, the plywood chipped and they started to get ugly. The rear floorboard was replaced with mahogany and maple striped veneer to match the deck, and then glassed on top. One of these years I will get around to redoing the forward cockpit floorboards to match. The final recommendation—after much experimentation and repair over the years—is to leave a good 3/16″ gap all the way around to allow for easy insertion and removal.
This home-built runabout boat is in the water for 5-6 months of the year and stored outside in the winter, which means UV damage, and scratches in the finish. Epoxy requires a topcoat for UV protection. It is common practice to use typical marine (spar) varnishes (Z-spar, Epifanes, etc.). However, halfway through the second summer after a coat of varnish had been applied, the finish would dull and start crazing. The next spring we’d have to scrape, sand and refinish.
For a boat stored indoors, this would not be anywhere near as much of an issue, but indoor storage is just not an option for us. For the third round of varnishing I used DuPont Imron 500s Clear, a 2-part linear polyurethane finish with excellent UV absorption. It is also much harder than varnish so it does not scratch as easily—which is important because we are constantly climbing over the deck for watersports. This is a better finish by far, and lasts 5-7 years. We are now on our second coating of Imron and it is still looking good.
To apply the Imron, all vestiges of the old finish must be removed. This means a thorough scraping and sanding. Additionally, it is best to remove the UV-damaged, topmost portion of the epoxy. Use a cabinet scraper to remove epoxy until the shavings change from yellowish to white. If you have to scrape a lot, you will have to rebuild the epoxy layer and allow that to cure before finishing with Imron.
Spraying Imron requires a substantial investment: A sprayer, the system’s hardener, proper reducers, protective gear and a forced-air respirator. Before spraying this or any coating system, contact the manufacturer for accurate health and safety information.
One of the drawbacks of leaving the boat in the water through October is condensation resulting in mildew inside of the hull and boat cover. Smooth and clean surfaces cut down on mildew growth considerably. It’s important to create nicely full fillets in the corners. All of the edges along the battens, frames, and the hull planks are filleted. Most of these were done during initial construction but there were areas we filleted later, after discovering them due to the way they caught dirt and mildew. These required thorough cleaning before we touched them up with fillets. The fillet mix I used was epoxy thickened with 406 Colloidal Silica filler, and ash wood sanding dust in approximately equal parts for a color match to the ash framing.
It’s also important not to skimp on epoxy when coating the underside of the deck of your home-built runabout. It needs three full coats of epoxy, just like everywhere else. Areas with only thin epoxy coats tend to develop mildew much faster.
It seemed natural to varnish the interior to provide UV protection. So as part of the second varnishing, we cleaned, sanded and varnished the interior sides and bottom. This looked great initially. However, the constant moisture in the boat penetrated the varnish. After the first winter of storage, it was flaking off in big sheets, and the worst was in the bilge. I touched it up that spring, but the next winter it was even worse. It all came off (both naturally and with scraping). Now we just have the epoxy finish on the inside.
Probably the most problematic item we had to deal with was the color and design of the cover. The cover is made of Sunbrella® which is an incredible fabric. However, I wanted it to match the chosen bottom color which was forest green. The problem is that this dark color absorbs far too much sunlight. In mid-summer, uncovering my home-built runabout required kneeling on a towel because the deck and hardware were too hot to touch. This was inconvenient. The real problem was that the excess heat caused a cross-hatch pattern to show up on the epoxy wherever there was a combination of tight-fitting boat cover and southernmost sun exposure. Eventually, this got to be unsightly. I used a hot air gun and a scraper to removed portions of the fiberglass along the port side deck by the engine hatch, which was not fun.
Some other builders had questioned my use of fiberglass on the deck of my home-built runabout. In another experiment, I coated the repaired section with epoxy without fiberglass. This was a mistake. The joints between the walnut opened up by the end of summer. The next spring I peeled back a larger area, from the front cockpit back to the rear cockpit and then applied new fiberglass and epoxy.
By this time I’d had enough, so I replaced the dark green cover with a new off-white cover. This one has posts to keep it lifted off the deck. This arrangement also provides better water runoff. The new cover also has skirts on the rear sides which cover the tumblehome and the transom. These are areas that get particularly bad UV damage otherwise. The new cover has been in use for a few years and has worked out very well. There has been no recurrence of the cross-hatch pattern damage to the finish, and the boat is noticeably cooler when uncovering.
I originally took the concept of the waterline junction of the bottom paint and the clear finish far too literally. I aimed for having this boundary right at the empty-boat, docked-waterline level. I hit this pretty darn close, unfortunately. The problem is stored equipment, bilge water and rainwater accumulation mean the boat is rarely empty. As such, the true water line might be 1″ to 2″ higher at times. Clear finishes are water permeable and will de-bond over time (especially over the winter). This resulted in the clear finish near the waterline flaking off and looking ugly. I raised the waterline and added the white accent stripe. It is probably 2″ to 3″ higher than it was originally. It no longer has a flaking finish.
When constructing a home-built runabout, and even more importantly when refinishing, scraping is far superior to sanding for:
Learn to properly use cabinet scrapers and have several at hand sharpened and ready for each session. See Tom Pawlak’s “Scrapers” article from Epoxyworks 19 for more information on using and tuning cabinet scrapers.

In a runabout, the seat cushions take a beating. They don’t just get sat on; they are stepped on, kneeled on and stressed due to the sun. We are ready to recover the seat bottoms for the fourth time. The backs are still OK. The bottoms get far more UV damage due to orientation. This shows up as hardening and cracking. The first to deteriorate are the seams on top. We had originally chosen a raised front edge and resulting seam. This was the first part to crack and tear. Next time, the seat bottom cushions will be smooth on top. Also, choose a light color. Just like the boat cover, dark seats get hot in the sun. Ours were originally maroon.
It was hard to find good data on what prop to use on my home-built runabout. I used the Michigan wheel prop calculator, which emphasizes a fully loaded boat, and this suggested a 3-blade 13x14P prop. This would easily let the engine over-rev if we were not careful, even with eight people in the boat. We then went to a 4-blade OJ 14x16P which was re-pitched to 17P with cup. This one almost keeps the RPMs in check at wide-open throttle. We need a new prop because the old one has been repaired too many times due to damage from rocks in the channel where we keep the boat.
Remember that one of the major advantages of wood epoxy composite construction is that it is very light. Our boat is ~2000 lbs. all loaded up–minus passengers. The engine is rated at 325HP and we have a 1.23:1 reduction in the transmission. This is the same powertrain you will find in a fiberglass competition ski or wakeboard boat that weighs 1000-2000 lbs more. Even with the steeper prop, the hole shot is great. You can never just whack open the throttle or you will yank the handle out of the hands of a skier (even good slalom skiers who ask for a quick start). We have also done water skiing starts three people deep with no problem aside from “ski line macramé.”
I’m confident that with continued care, maintenance and attention to detail, our family will continue to enjoy WOW for many years to come.


