

by Ken Stewart
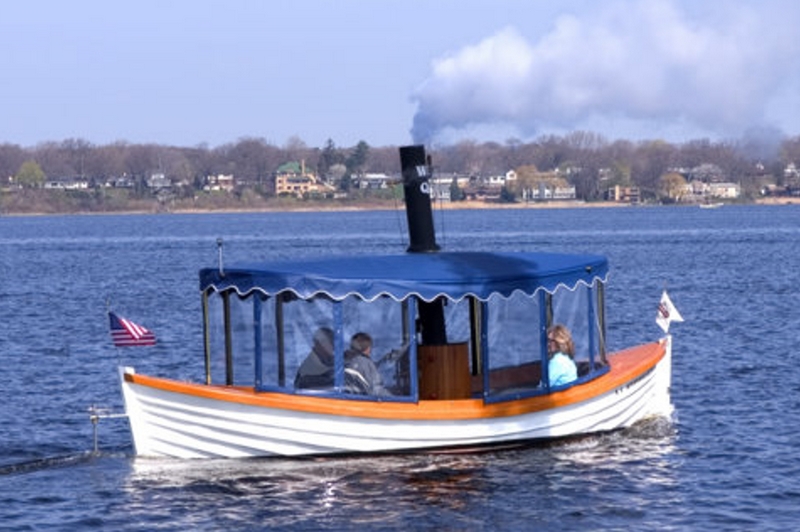
Above: The completed Woodville Queen with a full head of steam.
My father, Glenn P. Stewart, instilled in me an interest in steam engines. He frequently talked about his early experiences (about 1930) working in a sawmill powered by a steam engine. A thought went through my mind. Here I am a graduate mechanical engineer and I don’t even know how a steam engine works. So I went to several steam engine shows in the area and got more interested in them while learning how they operate. My wife and son Mike bought me a steam launch kit with a boiler and engine kit which I enjoyed building and operating with radio controls.
Since I am a sailor it was only natural to look for a marine steam engine. My search ended with Mel Lugten of Hamilton, Michigan, who sold me a steam launch and an antique marine steam engine. It was double acting with a 3″ bore and 3″ stroke. It didn’t have a nameplate. About 100 years ago any city or town that had a good foundry and machine shop also had someone building steam engines. For fear of being sued for patent infringement, they didn’t put nameplates on their engines.
I joined the International Steamboat Society and read all the material I could about boilers and engines. Around 1977, I designed and built a vertical fire lube boiler in my shop. I built a wooden base for the boiler and engine mounting, everything as it would be in a boat. This allowed me to test the boiler and engine, running them under load (with a prony brake) to determine horsepower, RPM, pressures, temperatures, water consumption, and the amount of wood used. The major revision I made was adding a water leg to cool the fire box, preventing the lagging from burning.
Satisfied with the boiler and engine performance, my next step was to find a suitable hull. I’d spent a couple of years looking, when in 2002 someone told me about a steamboat stored in a back yard. The boat was outdoors but covered, and was filled with junk. The owner had passed away about 20 years earlier and his widow was happy to sell it. The boat was a 21′ double-ended ship lifeboat made of ribbed galvanized steel. The engine was missing and the former owner had built a wooden canopy with a windshield, sort of like a cabin cruiser. It looked pretty rough but I liked the lines and the fact that it was steel. My shop is much better equipped to weld steel than for working with wood and fiberglass.
I bought a boat trailer and with the help of our sons, Jim and Mike, we loaded the boat and put it in the shop. My sons were embarrassed to be trailering it, but they did it for me.
I worked on the boat only during the winter months because I have a sailboat to care for and sail throughout summer.
2003—Prepping the Woodville Queen’s hull
I discarded the collected junk (mostly car parts) and stripped the hull by removing the cabin, seats, boiler, prop, and shaft. The parts I salvaged were a 3/8″ Penberthy injector, a 20″×27″ three-blade propeller, a large steam whistle, a brass six-spoke steering wheel, and a 1″ brass stuffing box with outboard bushings.
I carefully measured the hull in order to make reasonably accurate AutoCAD drawings of it. The only wooden members left were the gunwales, keel (3″×6″), stem and The Woodville Queen The completed Woodville Queen with a full head of steam. stern. The stem and stern pieces were covered with galvanized metal and had rotted. I decided to build a new tubular steel keel (3″×10″×3/16″) and stem and stern (2″×6″×3/16″). The deeper keel would eliminate the need for a skeg and allow the addition of ballast for increased stability.
The hull was attached to the wood keel with two ¼”×2″ bars and seventy ¼” bolts which I chiseled off. Under the bars were about a thousand rusty nails I had to remove by hand. I fabricated the stem, stern, and keel including the prop shaft tube and shaft thrust bearing support. Then I welded continuously inside and outside to the keel (hull and keel flush). All the supports for the boiler, engine, floor, and bulkheads I also welded in place. The hull had over one-hundred ¼” bolt holes which I plugged with rivets.
With the welding complete I sandblasted the hull and painted it with ZRC, a cold galvanize coating. I built a storage building that included a 30’×20′ boat shop, a two-ton overhead crane, and a large wood stove. After I moved the boat into the boat shop and I spent my spare time in the winters there for the next four years
2004—Finishing the hull and building the decks
I bolted the existing oak gunwales to the steel hull and removed all protruding nails, bolts and screws. Then I rough sanded the gunwales for gluing with WEST SYSTEM® Epoxy, as well as the cabin coaming and the new oak covering the old gunwales. For bending the coaming, which has an 18″ radius at the corners, I built a steam chamber and a clamping/bending fixture. I made the coaming of red oak and glued it to the inside of the original gunwales, which I covered with new oak. Next, I painted the hull inside and out with two coats of industrial white epoxy paint.
I built the fore and aft decks with curved ¾” pine deck beams, ¼” fir plywood and ¼”×1½” oak strips epoxied to the plywood. So the deck could receive mooring cleats, I reinforced it with 2×4s. Then I drilled oversized screw holes for the cleats and chocks and filled them with epoxy. Finally, with everything finish-sanded, I applied four coats of Sikkens™ finish.
2005—Installing the engine
For the interior I selected beaded oak veneer. However, all I could find was ¼” thick so I glued ¼” plywood to each piece. I bolted the fore and aft bulkheads to a 1 8″ angle iron (previously welded to the keel and hull) and epoxied it to a deck beam and the hull. I trimmed the doors and openings with ¼”×1½” oak.

To install the boiler and engine I used bolts threaded into holes in angle steel welded to the deck and hull. Directly under the boiler engine, I placed a stainless steel plate.
I machined a 1¼” galvanized pipe for the brass stuffing box at one end and coupled it to a 1¼” threaded stainless steel tube welded into the 6″×2″ sternpost. This tube I machined to receive the cutlass bearing. I installed the 1″ diameter polished stainless steel prop shaft with the thrust bearing and machined the adapter to receive the propeller. The rudder is 1/8″ stainless steel welded to a 1″ diameter stainless steel shaft. I keyed a 10″ diameter V-belt pulley to the shaft for steering.
2006—Seats, cabin sole, and steering
From a local boat builder, I bought ¾” teak and holly veneer plywood for the cabin sole. I cut the five pieces and fastened them with machine screws in tapped holes in floor angles.
For the seats, I repurposed plyform restaurant booth seats. I cut these to about 24″ long and cut the backs to match the bottom of the coaming. From the bottom of the coaming to the edge of the cabin sole, I glued seat boxes of beaded oak and ¼” plywood. Firewood is stored under the seats.
I glued a steering console of the same beaded oak and ¼” plywood to the hull, adjacent to the boiler, then installed the steering wheel with cable steering. An aluminum grooved rope drum and the 10″ V-belt pulley allow 1½ wheel-turns for 45° rudder travel. Delrin™ pulleys turn the cable and Delrin guide blocks installed along the underside of the gunwale get the steering cables to the aft cabin and the rudder.
I was a little apprehensive, but since everything was operable I put the boat in the water on a clear, cool spring morning. I went over a checklist and determined everything was in order, then built a fire and went for a ride. I had three other 200 lb men on board. Everything went well and I was very happy.
2007—Wiring, batteries, coaming, and navigation equipment
I removed the cabin sole (floorboards) to install the electrical wiring. In the stern cuddy, I mounted a 12-volt marine battery. All the wiring would be hidden under the floor and terminated in the console. I installed overhead lights in both cuddy cabins. The instruments mounted on the console were a Delco™ AM-FM radio/MP3 player, a Raymarine™ Tri-Data (speed, depth, log), a West Marine™ DC fuse panel, a tachometer (bicycle speedometer), and a compass.
I designed the canopy on Auto CAD using a square 1″ aluminum tubing support frame and a vinyl covering. Using 3/8″ stainless steel threaded studs epoxied into the oak, I attached the 14 gold anodized vertical tubes to the oak coaming. I hid the wiring for the two cabin overhead lights, the navigation lights, and the radio antenna in a 1½” brass tube between the console and the overhead canopy frame.
Muskegon Awning Company sewed the canopy at their shop. It’s navy blue vinyl with 14 zippered windows. To install it, I had to remove the smokestack.
With the stack reinstalled, cabin lights mounted, and navigation lights mounted to the exterior of the canopy, the Woodville Queen is now ready for excursions. But keep in mind that the boat is only an excuse for running the steam engine.


